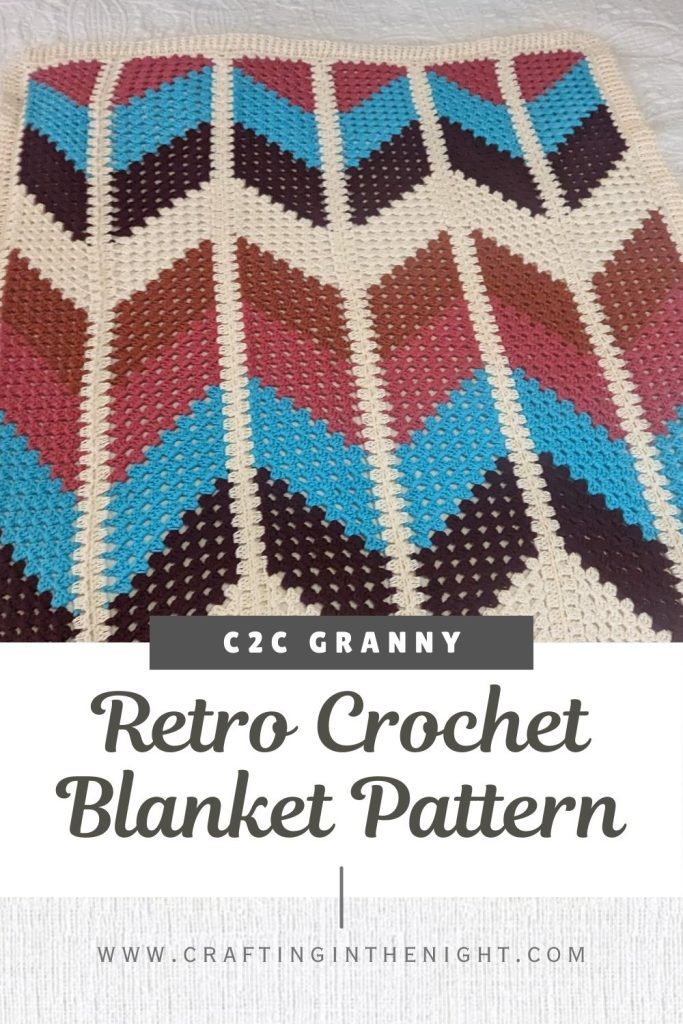
In the world of crochet, few designs evoke the warmth of nostalgia quite like the classic granny square. Its timeless charm and versatility have made it a beloved choice for crafters across generations. Now, imagine taking that beloved granny square and giving it a fresh, retro twist. That’s exactly what we’re about to explore in this blog post as we introduce you to the Retro Corner-to-Corner (C2C) Granny Baby Blanket Pattern.
This pattern brings together the best of both worlds – the vintage appeal of the granny square and the modern flair of a chevron design. But what makes this pattern truly special is its method of construction. Rather than working the entire blanket in one piece, we’ll be creating six individual panels using soft and breathable cotton yarn. These panels are not only a breeze to crochet, but they also offer endless possibilities for customization. You can adjust the length and width to suit your preferences, making it a perfect project for beginners and experienced crocheters alike.
So, if you’re ready to embark on a crochet journey that combines the comfort of the past with a touch of contemporary style, grab your hook and some cotton yarn – because the Retro C2C Granny Baby Blanket is the ideal project to indulge your creative spirit. Let’s dive into the pattern and create something beautiful together!

Materials
I worked this blanket up in cotton yarn however, you could use any type of yarn and the appropriately sized hook.
Main Color (MC): Yarnbee Sugarwheel Cotton Solids – Soft Gardenia
~120 yards or one cake used for the Stripes
~557 yards for the border
677 yards total – So just over two cakes (335 yards / cake) if you work this up in the same colorway I did.
I Love This Cotton – Hobby Lobby
- Color A (A) – Aubergine – 2 skiens or ~330 yards
- Color B (B) – Turquoise – 2 skiens or ~330 yards
- Color C (C) – Rosey II – 2 skiens or ~220 yards
- Color D (D) – Bruschetta – 2 skiens or ~220 yards
🛒 Shopping Note: As of 10/12/2024 I can’t find the Sugarwheel Cotton Solids on the Hobby Lobby Website. You should be able to substitute any color of I Love This Cotton. You will need approximately skeins if you plan on working the border in the same color as I did.
Tools
- Size H (5.0 mm) Crochet Hook – (I use this set)
- Stitch Markers – (I use these ones)
- Yarn Needle
Size
Finished size is 42 inches wide x 44 inches tall
Stitches Used
Single Crochet (sc)
- Insert hook under both top loops of the stitch you are working into.
- Yarn over (yo)
- Pull through the stitch (there should now be two loops on your hook)
- Yarn over (yo)
- Pull through both loops on your hook.
Granny Cluster
- Work 3 double crochets into the same stitch
Free Retro Crochet Blanket Pattern
- Dimensions:
- Gauge: C2C Granny 4 tall by 4 wide = 3″
- Skill Level: Beginner
Panels (make 6)
With main color, start with a magic circle.
Row 1: Chain 3, work 3 double crochets (granny cluster) into magic circle, chain 1, work double crochet.
Row 2: Chain 3 and turn. Work granny cluster into chain 1 space in the row below. Work granny cluster in between the granny cluster from row 1 and the starting chain 3. Chain 1 and double crochet into the same space.
Rows 3: Chain 3 and turn. Work granny cluster into the chain 1 space. * Work granny cluster between next two granny clusters from the row below. Repeat from * till the end of the row. Work granny cluster between the last granny cluster and the chain 3. Chain 1, work double crochet into same space.
Rows 4 – 7: Repeat row 3, changing to color A in the last double crochet.
Row 8: Chain 3, work granny cluster into the chain 1 space in the row below. * Work granny cluster between next two granny clusters from the row below. Repeat from * till the end of the row. Work double crochet into space between the last double crochet and the chain 3.
Row 9: Chain 3 and turn. Skip the chain 1 space and work a granny cluster into the space between the first two granny clusters in the row below. * Work granny cluster between next two granny clusters from the row below. Repeat from * till the end of the row. Work granny cluster between the last granny cluster and the chain 3. Chain 1, work double crochet into same space.
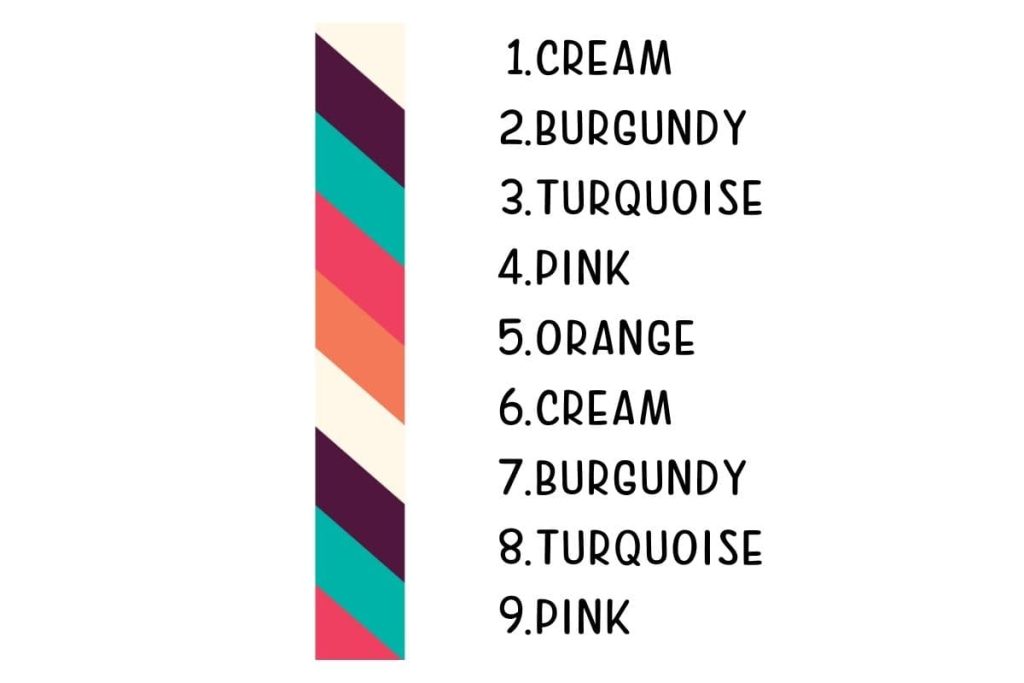
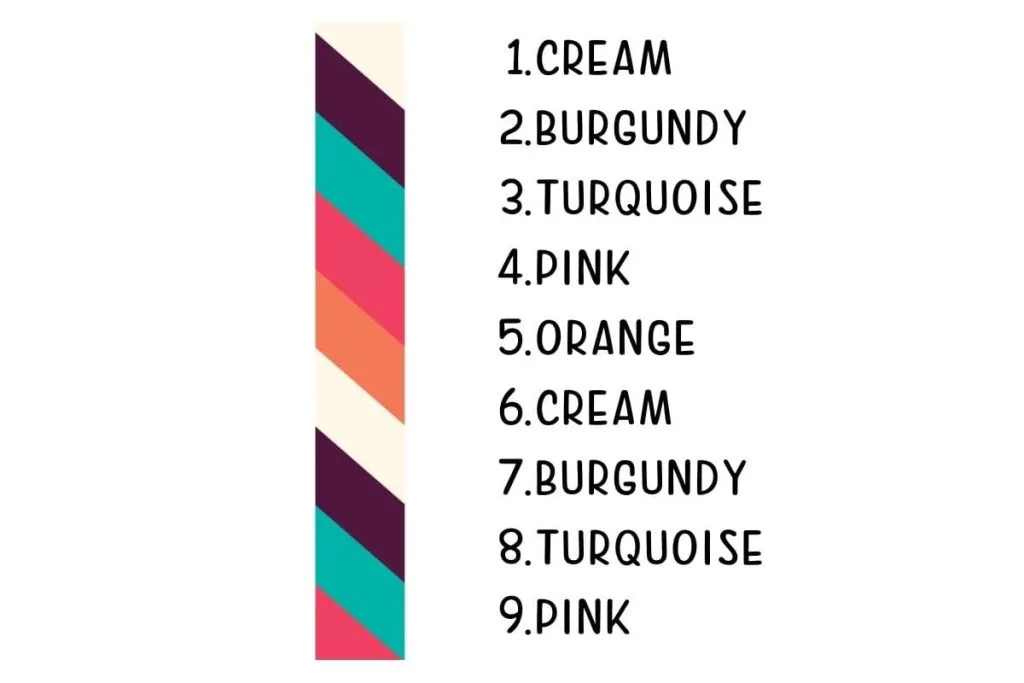
Rows 10+: Continue repeating rows 8 and 9. Each color will have seven rows. Change colors using the following color sequence:
- 7 Rows Color A
- 7 Rows Color B
- 7 Rows Color C
- 7 Rows Color D
- 7 Rows Main Color
- 7 Rows Color A
- 7 Rows Color B
Row 57: Chain 3 and turn. Skip the chain 1 space and work a granny cluster into the space between the first two granny clusters in the row below. * Work granny cluster between next two granny clusters from the row below. Repeat from * till the end of the row. Work double crochet into space between the last double crochet and the chain 3. Chain 1, work double crochet into same space.
Row 58 – 62: Chain 3 and turn. Skip the chain 1 space and work a granny cluster into the space between the first two granny clusters in the row below. * Work granny cluster between next two granny clusters from the row below. Repeat from * till the end of the row. Work double crochet into space between the last granny cluster and the chain 3.
Row 63: Chain 3 and turn. Work granny cluster into the space between the two granny clusters from the row below. Double crochet in the space between the last granny cluster and the chain 3 in the previous row.
Row 64: Chain 1 and turn. Double crochet into the space between the final double crochet and the chain 3. Finish your work.
Weave in all ends before proceeding to assembly.
Assembly
Panels are joined together using the Join As You Go (JAYG) method.
1st Panel: Join color a with slip stitch in any corner space. Chain 3 and work two double crochets into same space. Chain 2, work 3 double crochets into same space. *Work 3 double crochets into each stitch across until you reach the corner. 3 double crochets, chain 2, 3 double crochets for the corner. * Repeat from * around until you reach your starting chain 3. Join with a slip stitch to the top of your starting chain 3.
Remaining Panels: Repeat as above joining panels as shown below.
Edging & Border
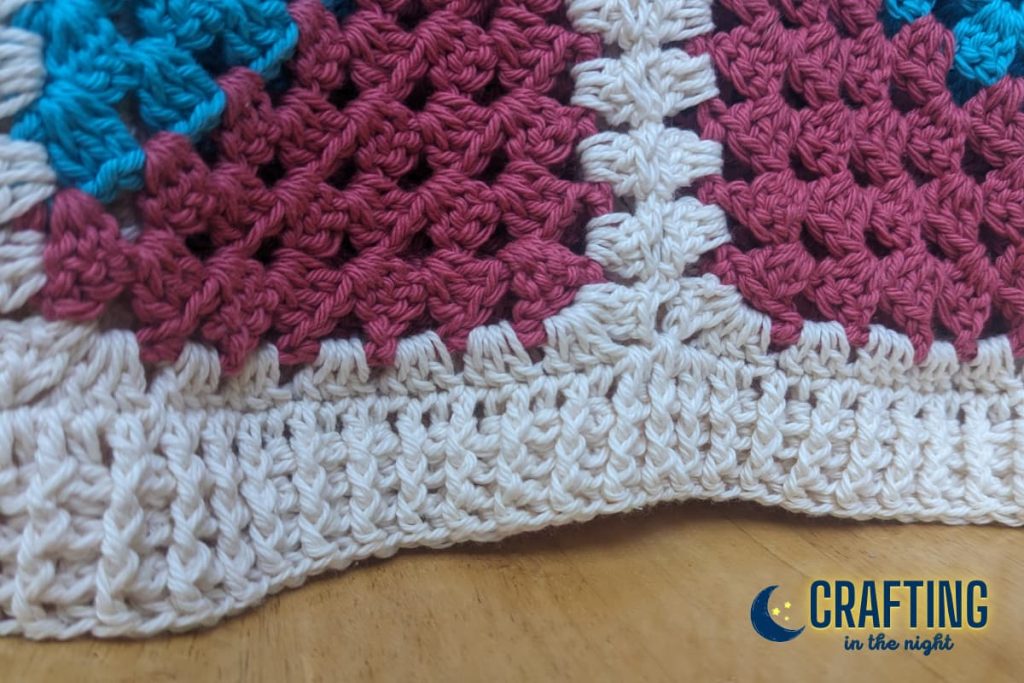

For this blanket, I wanted to ensure the colorful chevron blocks were the primary focus of the blanket so I chose to use Soft Gardenia for both the edging and the blanket. Since I wanted to do a front post / back post crochet border, I used double crochet for the edging since it can also serve for the first row in that border.
In total, the edging and border used 236 grams or approximately 557 yards.
Edging
Join main color with slip stitch into the top of any double crochet. Work one double crochet into the top of each double crochet. When you reach a segment where two panels joined, work two double crochets in the corner space of the first panel, one double crochet under the joining chain, and two double crochets in the corner space of the second panel.
From there, continue working double crochets into the top of each double crochet. Work 5 double crochets into each of the four corner spaces. once you have worked all the way around the project, join with a slip stitch to the top of your starting chain 3.
Border
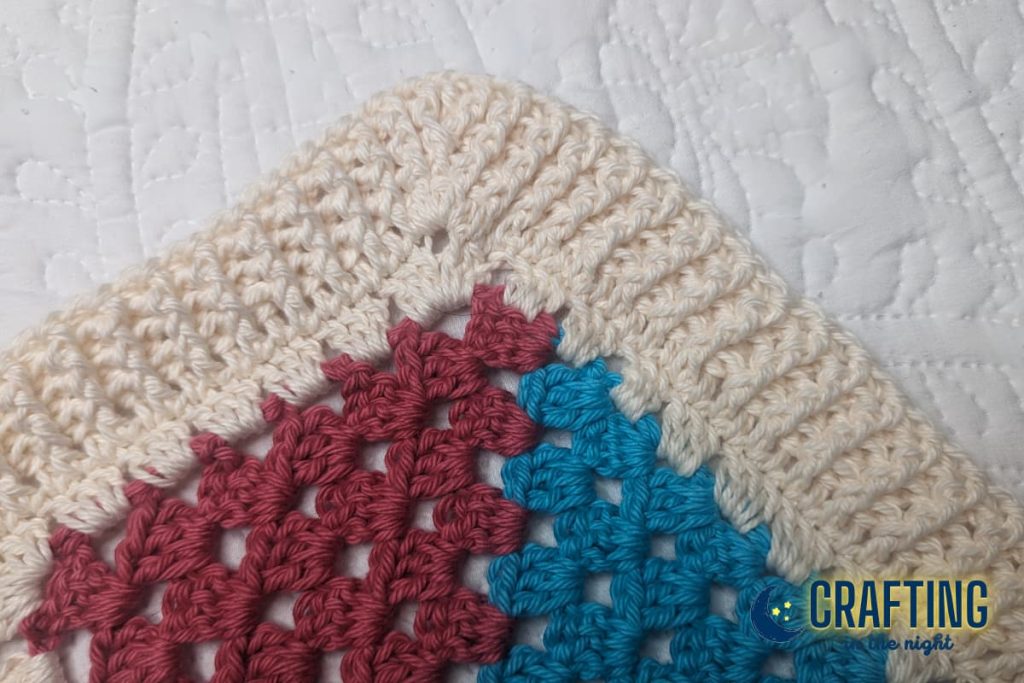

You can choose any type of border you like for your project. For the blanket I made, I edged the project with one row of double crochets. Then, I decided to do a Front Post / Back Post ribbing border for four rows.
Changing the Size
- To make the panels longer, just continue repeating the color sequence.
- To make the panels wider, continue increasing with the first color until the panel is the width you want. Then, for each subsequent color work that number of rows in height. I.e. if you increase the # of stitches to 10, then each subsequent color would be 10 stitches x 10 rows high.
- Calculating Amount of Yarn Needed: If you are wanting to make longer panels, or more panels, you can calculate the yarn usage like this. For the panels, each half section at the top and bottom is approximately 5g or 10 yards. Each full stripe is ~15g or ~28 yards. This assumes you’re following the rest of the pattern exactly.
Tips & Tricks
- If at all possible try not to have long gaps in between making the panels. Your guage may fluctuate over time so the best way to ensure all panels have the same dimensions is to complete them within a similiar time frame.
- Knowing that the above is easier said than done, if any panels are not the same size, consider blocking them before joining.