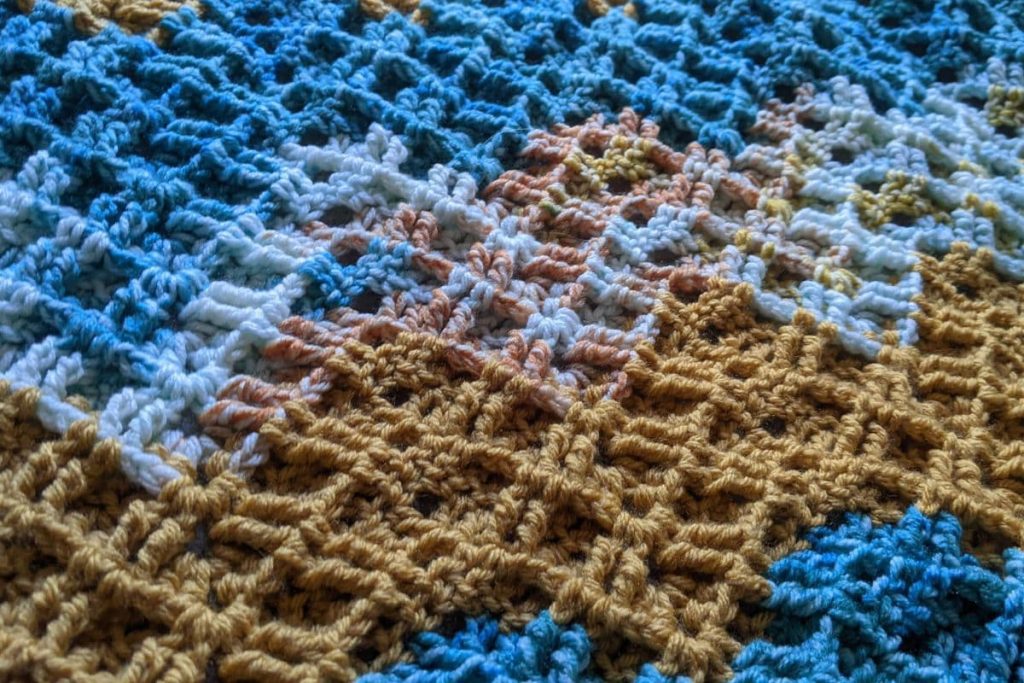
This textured ripple crochet pattern is a beautifully versatile crochet stitch. After the first three setup rows, it’s a simple 1 row repeat. This unique pattern combines the classic ripple design with added texture. With its eye-catching appearance and intriguing surface, the textured ripple pattern adds a new dimension to the world of crochet.
The texture in this blanket is created with a combination of basic stitches such as double crochet, double crochet two together, and front post triple crochet. The pattern requires a foundation chain with a multiple of 23 + 3 to start, making it easily adaptable for various project sizes. The end result is a visually appealing fabric with a ripple effect and intriguing texture.

Materials and Tools
Required Materials
- I Love This Yarn – Deep Sea Diving – 2 Skiens
- I Love This Yarn – I Love This Teal – 2 Skiens
- I Love This Yarn – Sungold – 1 Skien
- Size J Crochet Hook (6.0mm) – (I use this set)
Yarn Selection
I prefer using worsted weight (4) yarn for this blanket. While any size yarn could be used, I find that a worsted weight yarn really brings out the texture of this pattern and makes for a wonderfully squishy blanket.
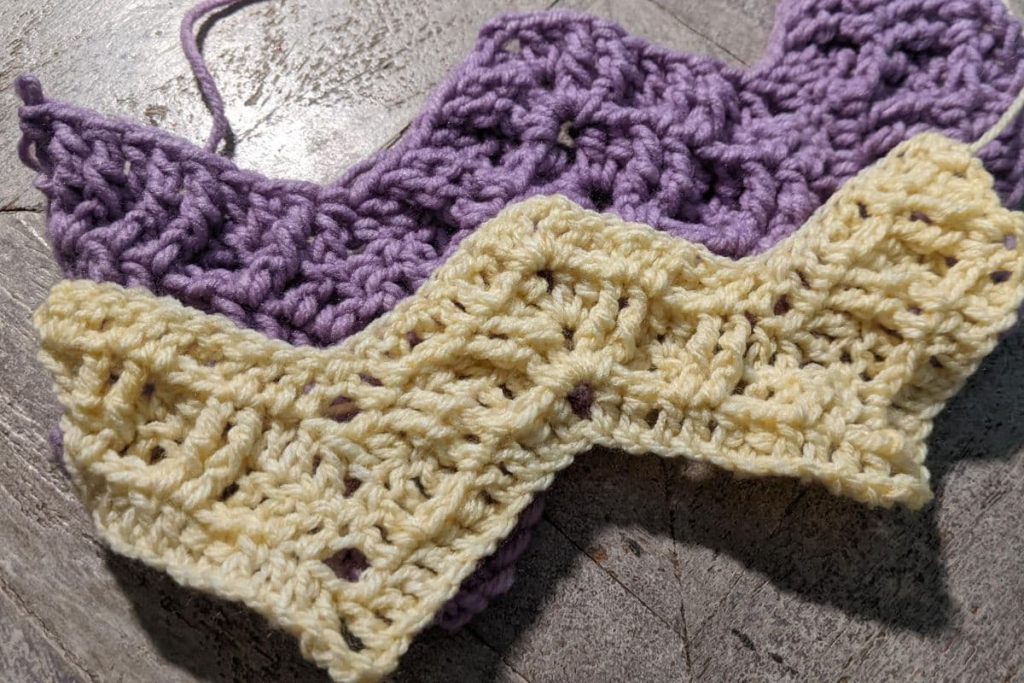
Here you can see two swatches I created. The purple one is in worsted weight (#4) yarn and the yellow one is a #3 yarn (Lion Brand Mandala). While the thinner yarn still creates a nice pattern, the worsted weight yarn really highlights the texture of this pattern.

For this blanket, I used three coordinating colors from Hobby Lobby’s I Love This Yarn line. The pattern would work up very nicely in a single color, self striping cake yarn, or any other color palette that suits your fancy.
Crochet Hooks
My go-to crochet hook for this pattern is a 6.00 mm hook, which I find suitable for working with worsted weight (4) yarn. Nevertheless, if you decide to use a different weight yarn, or a different brand of #4 yarn, make sure to change your hook size accordingly.
My rule of thumb for this pattern is to go up one size from whatever is recommended by the yarn label. In this case, the yarn label recommended a 5.5mm hook, so I chose to use a 6mm for this project.
Other Supplies
In addition to the yarn and crochet hook, there are a few other supplies I always have on hand to help me work on my crochet projects:
- Yarn needle: I use this for weaving in ends and sewing together parts of the project if necessary.
- Scissors: A pair of sharp scissors are essential for cutting the yarn neatly.
- Stitch markers (optional): These can be helpful for marking important stitches or rows in the pattern.
Textured Ripple Crochet Pattern Basics
Pattern Notes
In my experience, the textured ripple crochet pattern is an attractive and versatile design that adds depth and dimension to various crochet projects. The pattern consists of a repetitive combination of stitches, which creates a gentle wave-like effect, reminiscent of rolling hills. Here are some tips for this pattern:
- Too Many Double Crochets – If you accidentally do a peak with 3 double crochets instead of 2, skip one and do your front post treble crochets around the other two. The extra stitch should be sufficiently hidden in your work.
- Last Leg of the Row – Don’t forget to skip 1 fewer stitch for the last leg of each row.
- Working into the Chain 3 Space – While the pattern calls for two double crochets to be placed in the top of chain three at the end of each row, this can sometimes be hard to do depending on your tension and other factors. If you find this is difficult, you can simply work these two double crochets into the space between the chain 3 and the first stitch from the previous row. If you decide to go this route, its best if you are consistent with this modification throughout the blanket.


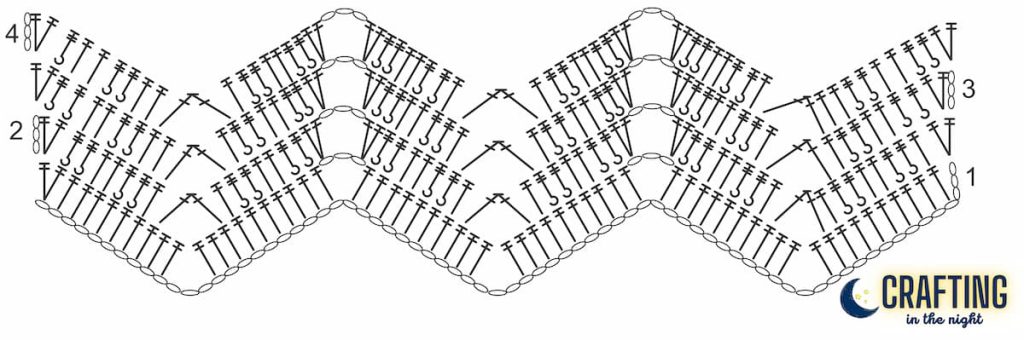
Stitch Techniques
To work on this textured ripple crochet pattern, you’ll need to start with a chain stitch in multiples of 23, plus 3 additional stitches.
Here is the list of stitches used in this pattern:
Chain (ch)
- Yarn over (yo)
- Pull through loop
Double Crochet Two Together (dc2tog)
- Yarn over (yo)
- Insert hook under both top loops of the stich you are working into.
- Yarn over
- Pull through two loops on hook
- Yarn Over
- Insert Hook under both top loops of the next stitch
- Yarn over
- Pull through two loops
- Yarn over
- Pull through all remaining loops on hook
Front Post Treble Crochet (fptc)
- Yarn over twice
- Insert your hook under the post of the next stitch, from front to back.
- Yarn over and pull up a loop.
- Yarn over and pull through two loops on your hook.
- Yarn over and pull through two loops on your hook.
- Yarn over and pull through two loops on your hook.
By mastering these primary stitch techniques and maintaining the sequence, you can create a beautiful textured ripple crochet pattern suitable for various projects.
Gauge Swatch
I highly recommend taking the time to create a gauge swatch. This will help you determine the number of repeats you need for your desired blanket width. This is especially helpful if you are using a different weight yarn or different sized hook.
I didn’t do this step for this particular blanket and I wound up with a baby blanket sized project instead of the adult sized throw I was hoping for. Lesson learned!
To crochet a gauge swatch, you’ll need a chain of 49. From there, I recommend working at least 4 rows of the pattern. This will allow you to get the hang of the stitches, especially the difference in working the last leg of each row.
To determine the number of repeats needed for your blanket you’ll simply take the width of your swatch and divide by two. This is the repeat length. Then, determine how many repeats you’ll need for your desired width.
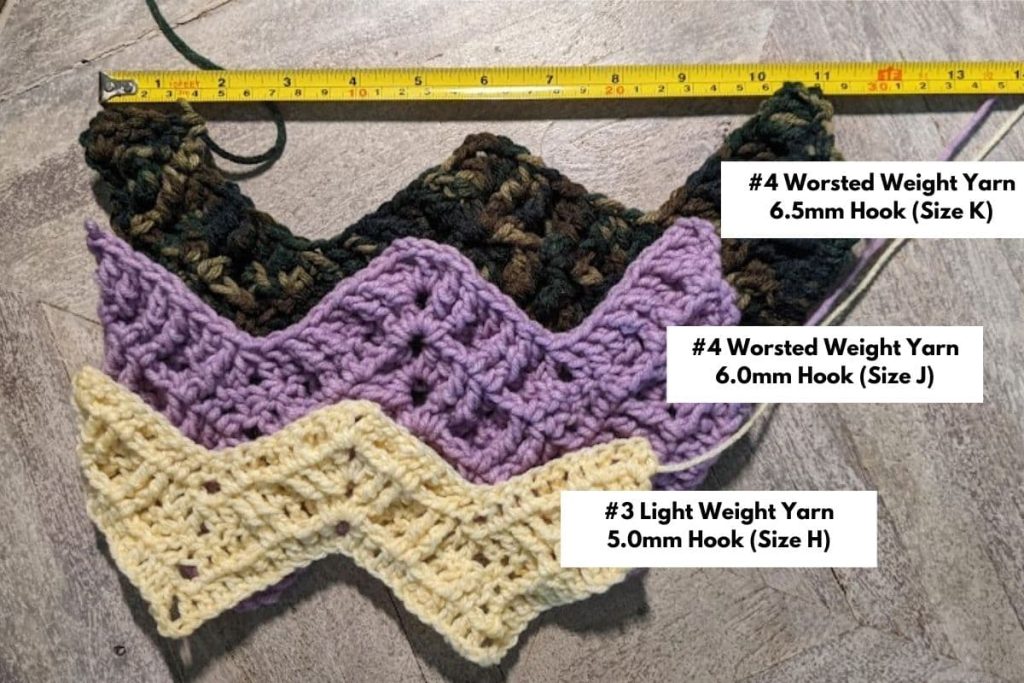
In this example, there are two swatches with #4 worsted weight yarn. One uses a 6.0mm Hook (size J), and the other uses a 6.5mm Hook (Size K). You can see that did make a difference in the width of the project. The third sample is using a #3 Light Weight Yarn (Lion Brand Mandala) and the recommended hook size for that yarn of 5.0mm (Size H).

Free Double Triple Ripple Pattern
- Skill Level: Intermediate
- Gauge: 10″ W x 3.5″ H
- Finished Size: 37″ W x 36″ H
- # Ends to Weave In: 2
Foundation Chain
In creating the foundation row for this textured ripple crochet pattern, the first step is to make a chain of stitches in multiples of 23 plus 3. For this blanket I used a starting chain of 164 in color A.
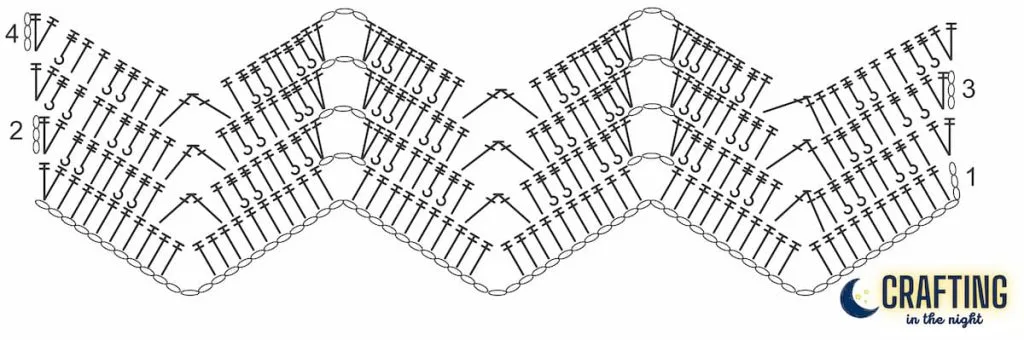
Row 1
Double crochet in the 4th chain from the hook. Double crochet in the next 9 chains (this forms 11 double crochets for the first side). *Skip 3 chains, double crochet in the next 10 chains, chain 3, double crochet in the next 10 chains.* Repeat from *. Place 1 extra double crochet in the last stitch (2 double crochets in the last chain).
Tip: At the end of row one, the starting leg and ending leg of the ripple should each have 11 stitches. All other areas of the ripple should have 10 stitches between the hills and the valleys.
Row 2
For row two and moving forward, I’ve broken this version of the pattern up into the main components of the ripple. Once you start to learn the pattern, it becomes easier to know where you are and what you should do.
1st Leg: Chain 3, turn. Place 2 double crochets in the same space (4th stitch from the hook). In the following stitches work 2 Front Post Treble Crochets, 2 Double Crochets, 2 Front Post Treble Crochets, 1 Double Crochet.
Valley: To create the valley, you’ll need to work [1 Double Crochet, Skip 4, 1 Double Crochet] together.
Uphill: Double crochet in next stitch. In the following stitches work 2 Front Post Treble Crochets, 2 Double Crochets, 2 Front Post Treble Crochets.
Peak: Work 2 double crochets into the chain 3 space, chain 3, work 2 double crochets into the chain space.
Downhill: Into the next stitches work 2 Front Post Treble Crochets, 2 Double Crochets, 2 Front Post Treble Crochets, 1 Double Crochet.*
Repeat from * until the last leg of the ripple.
Last Leg: For the last valley you will work [1 Double Crochet, Skip 3, 1 Double Crochet] together. Then, complete the rest of the last leg by working 1 double crochet, 2 Front Post Treble Crochets, 2 Double Crochets, 2 Front Post Treble Crochets, 2 Double Crochets in top of chain 3 from previous round.
Row 3
Starting in this row, the number of stitches skipped in our double crochet 2 together changes. I’ve bolded those changes in the pattern below.
1st Leg: Chain 3, turn. Place 2 double crochets in the same space (4th stitch from the hook). In the following stitches work 2 Front Post Treble Crochets, 2 Double Crochets, 2 Front Post Treble Crochets, 1 Double Crochet.
*Valley: To create the valley, you’ll need to work [1 Double Crochet, Skip 3, 1 Double Crochet] together.
Uphill: Double crochet in next stitch. In the following stitches work 2 Front Post Treble Crochets, 2 Double Crochets, 2 Front Post Treble Crochets.
Peak: Work 2 double crochets into the chain 3 space, chain 3, work 2 double crochets into the chain space.
Downhill: Into the next stitches work 2 Front Post Treble Crochets, 2 Double Crochets, 2 Front Post Treble Crochets, 1 Double Crochet.*
Repeat from * until the last leg of the ripple.
Last Leg: For the last valley you will work [1 Double Crochet, Skip 2, 1 Double Crochet] together. Then, complete the rest of the last leg by working 1 double crochet, 2 Front Post Treble Crochets, 2 Double Crochets, 2 Front Post Treble Crochets, 2 Double Crochets in top of chain 3 from previous round.
Row 4
This is the repeat row for the rest of the pattern. The patterns for the 1st leg and last leg change completely here. This is because we want to maintain the texture on the sides as much as possible. In order to do that, we need to try and place our Front Post Treble Crochets around each Double Crochet from the previous round, and our Double Crochets on top of the Front Post Treble Crochets from the previous round. The exception to this is that we always want to use a double crochet for the double crochet 2 together valley transition due to stitch height.
1st Leg: Chain 3, turn. Place 2 double crochets in the same space (4th stitch from the hook). In the following stitches work 1 Front Post Treble Crochet, 2 Double Crochets, 1 Front Post Treble Crochet, 2 Double Crochets, 1 Front Post Treble Crochet.
*Valley: To create the valley, you’ll need to work [1 Double Crochet, Skip 3, 1 Double Crochet] together.
Uphill: Double crochet in next stitch. In the following stitches work 2 Front Post Treble Crochets, 2 Double Crochets, 2 Front Post Treble Crochets.
Peak: Work 2 double crochets into the chain 3 space, chain 3, work 2 double crochets into the chain space.
Downhill: Into the next stitches work 2 Front Post Treble Crochets, 2 Double Crochets, 2 Front Post Treble Crochets, 1 Double Crochet.*
Repeat from * until the last leg of the ripple.
Last Leg: For the last valley you will work [1 Double Crochet, Skip 2, 1 Double Crochet] together. Then, complete the rest of the last leg by working 2 Front Post Treble Crochets, 1 Double Crochet, 2 Front Post Treble Crochets, 1 Double Crochet, 2 Front Post Treble Crochets, 2 Double Crochets in top of chain 3 from previous round.
Continue repeating Row 4, switching colors as desired, until your project reaches its desired size. By mastering these simple steps, you can create beautiful, textured ripple crochet projects with ease.
FREE Pattern .PDF
This downloadable pattern is free for newsletter subscribers and includes:
• 12 pages of easy-to-follow instructions
• UK and US crochet terms
Color Sequence
For the blanket pictured, I worked 5 rows in each color as follows:
- 5 Rows
- 5 Rows
- 5 Rows
The color sequence repeats from there. Download the free written pattern to get a coloring sheet you can use to plan your blanket.
Customizing Your Crochet Blanket Colors
A great way to customize your textured ripple crochet is by changing the colors you use. Playing around with different color combinations can dramatically transform the look of your project and make it unique to you.
Some options to consider might include:
- Using a gradient effect with varying shades of the same color
- Mixing several contrasting or complementary tones for a bolder look
- Alternating between light and dark colors for a more striking effect
- Experimenting with variegated or self-striping yarn for visually appealing patterns
Whatever colors you choose, ensure that they complement each other and enhance the textured ripple pattern. Don’t be afraid to get creative and combine different colors to make your crochet piece truly one-of-a-kind!
Overall, the textured ripple crochet pattern is a versatile and eye-catching stitch that can be incorporated into a variety of projects. I hope these examples inspire you to explore the possibilities of this stitch in your own crochet creations.

