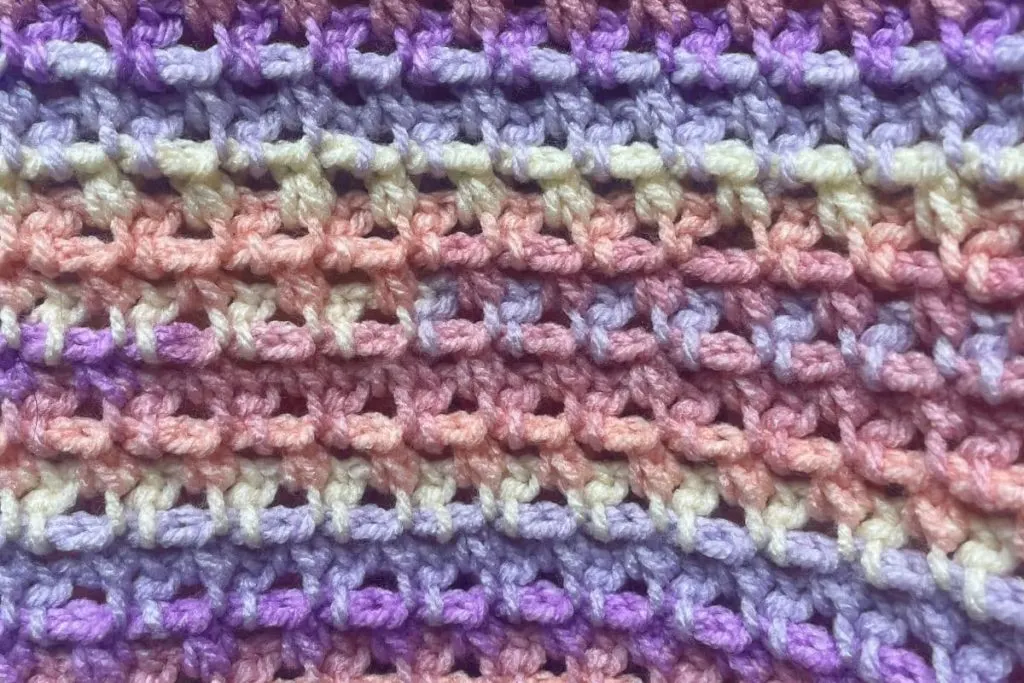
Crochet enthusiasts, get ready to add a new stitch to your repertoire! The sprinkle stitch is a fun and easy-to-learn crochet technique that can add texture and dimension to your projects. This stitch is perfect for beginners who are looking to expand their skills, as it works up super quickly and can be used in a variety of patterns.
What’s more, the sprinkle stitch has a rich history, dating back to the late 19th century and originating in a classic needlework book. The stitch didn’t have a name, and I haven’t been able to find a name for it on the web, so I’ve called it the “sprinkle stitch” based on the sprinkle like patterns it creates when worked up in variegated or self striping yarn.
This step-by-step tutorial to help you master this fun and versatile crochet stitch technique. So grab your hook and let’s get started!
Supplies Needed

The sprinkle stitch is super versatile. It can be worked up in any weight yarn using the appropriately sized hook.
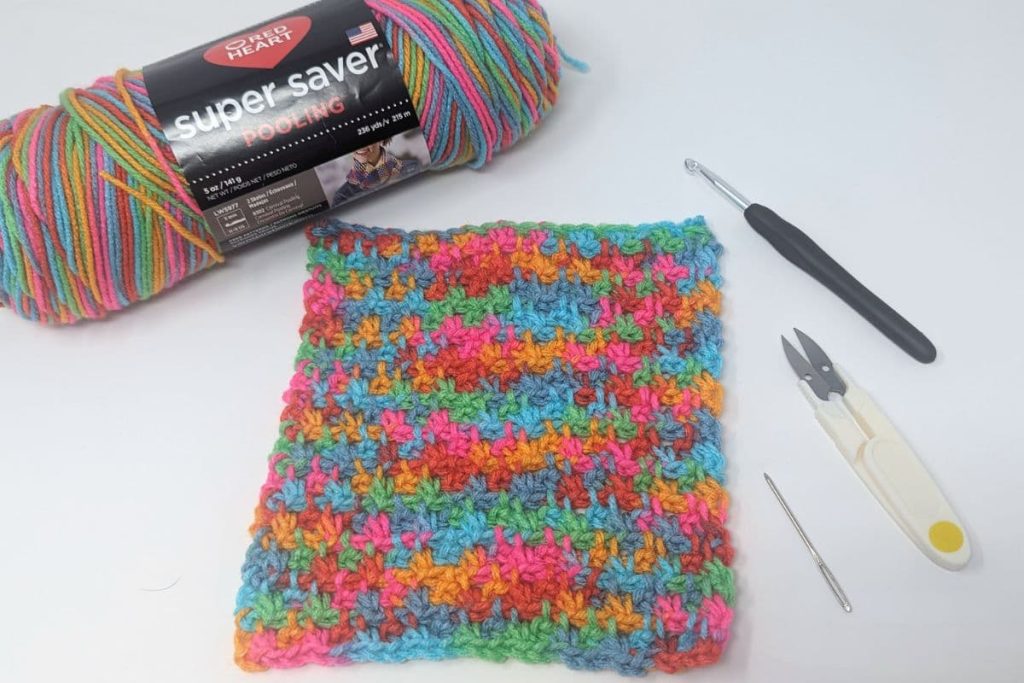
For our 7″ sample swatch I used:
- Red Heart Super Saver Pooling – Papaya
- Size I (5.5mm) Crochet Hook
You’ll also need a pair of scissors and a yarn needle to weave in your ends.
Basic Stitches in the Sprinkle Stitch
The sprinkle stitch uses just two basic concepts:
Chain (ch)
- Yarn over (yo)
- Pull through loop
Single Crochet Two Together (sc2tog)
- Insert your hook under the first stitch.
- Yarn over and pull up a loop
- Insert your hook under the second stitch
- Yarn over and pull up a loop
- Yarn over and pull through all three loops on your hook.
Crochet Abbreviations
Crochet patterns are filled with abbreviations and terms that can be confusing for beginners. Here are some common crochet abbreviations you should know for this pattern.
- Ch: This stands for chain. It is the foundation of most crochet projects and is used to create loops that are used to make stitches.
- Sc2Tog: This stands for single crochet two together.
- Ch-sp: This stands for chain space. It is the space created by a chain stitch and is used to create decorative patterns in a project.
- US terms: This refers to the American crochet terminology. In the US, crochet stitches and techniques are referred to by different names than in other parts of the world.

The original 1890’s pattern
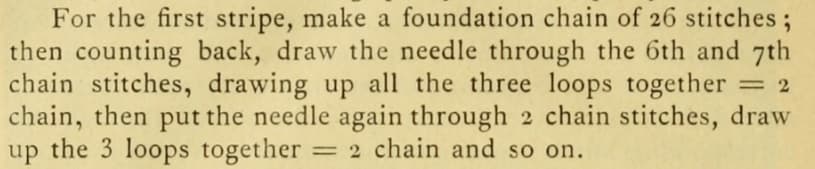
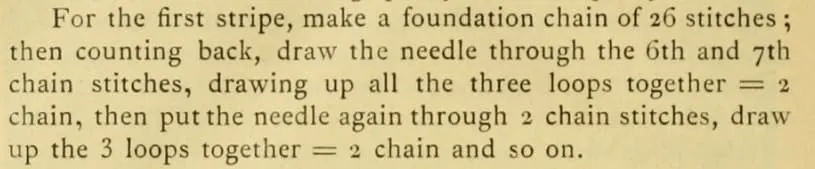
I’ve made a slight modification to the original pattern by having you crochet in the 5th and 6th chains from the hook instead of the 6th and 7th. This results in a more uniform appearance.
Crochet Chart

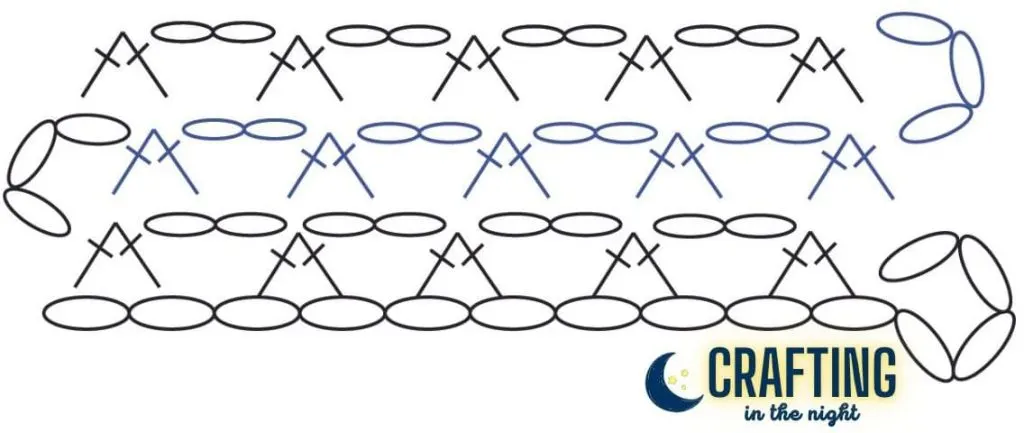
Sprinkle Stitch Instructions
Size: 7″ x 7″
Multiple: Any even #
Start with a chain of 24 (or any multiple of 2).
Row 1: Work a single crochet two together in the 5th and 6th chains from the hook. Chain 2. *Work a single crochet two together in the next two chains. Chain 2.* Repeat from * till you reach the end of the row. Chain 3 and turn.
Row 2: Work a single crochet two together into the top of the single crochet two together stitch and the chain 2 space in the row below. *Chain 2. Work a single crochet two together into the top of the next stitch and the chain 2 space.* Repeat from * until you get to the end of the row. Chain 3 and turn.
Row 2 is your repeat row. You’ll repeat this row until your item is the size that you need it to be.
Changing Colors
Changing colors is easiest at the end of any row.
- Insert your hook into the last single crochet of the row and pull up a loop. Insert your hook under the chain 3 space and pull up a loop. There are now 3 loops on your hook.
- Drop the current color of yarn and pick up the new color. Yarn over with the new color and pull through all three loops on the hook. Chain 3.
- Pull on the tails for both the old color and the new color to secure.
- Cut the old color, be sure to leave a long enough tail to weave in the ends.
Edging
Before adding a border, it’s helpful to first give your project an even edging. You can do this in any way that you are comfortable with but, here is how I work mine.
This method is fairly simple thanks to the chain spaces created on all sides of our project.
- Join with a single crochet into any chain 2 space at the top of your project. *Chain 3, single crochet into the next chain 2 space. * Repeat from * until you reach the corner. Once you reach the corner, single crochet into the last chain 2 space before the corner, chain 3, turn your work and place a single crochet as close to the corner on the other side where it fits.
- Going down the sides, you’ll place the single crochet in the space just to the right of the horizontal bars the stitch pattern created. The pattern continues in the same way, single crochet, chain 3, single crochet, all the way around.
- Finish off with a slip stitch to the starting single crochet.
💡Tip: You can do a chain 2 instead of a chain 3 between the single crochets if you desire. This will create less of a ruffle and allow you to do a tighter border.
Borders
If you work the edging as I describe above, you’ll have a nice chain space in which you can work a variety of border stitches. Two stitches that work well are the granny stitch and the shell stitch. Here’s how you could work those:
Granny Stitch Border
Continue with your edging color by chaining up three and working 2 double crochets into the chain 3 space. This counts as 3 double crochets (a granny cluster). Chain 1, work three double crochets into the next chain 3 space. Repeat from * until you get to the corner.
In the corner work 3 double crochets, chain 2, 3 double crochets.
Continue on in this fashion until you have gone all the way around your project.
Shell Stitch Border
Continue with your edging color. Place 5 double crochets into the chain 3 space. *Single crochet in the next single crochet. Place 5 double crochets into the next chain 3 space. * Repeat from * around.